
Using WildCard Items in Sitecore XM Cloud
Description
In the context of Sitecore, wildcards are a feature that allows you to create flexible URL structures for your website. They are used in the configuration of item paths and URLs to enable dynamic content handling. Using them offers flexibility, scalability, and improved user experiences. They allow you to create adaptable URL structures that can accommodate changes and variations in content over time. However, like any feature, it's important to use wildcards thoughtfully and with a clear understanding of your website's content architecture and user needs.
In order to accomplish this in XM Cloud it is needed to add some configurations and files to the solution. In this example, we need to create a WildCard for all the product detail pages.
Configure Solution
As you may know, in the solution there is a file called [[...path]].tsx inside the pages folder. This file is where all the requests arrive and then get redirected to their specific path. So the first thing we need to do is create a new folder inside the pages folder that will be the first part of the path for the WildCard. In our case, the folder will be products. There copy and paste the [[...path]].tsx and rename it to [...path].tsx so that only the URLs that start with /products/ are considered to go there. An example could be /products/category/product_id. In our case, we want to be more specific because we need that the URLs are only /products/product_id so we named the file just [path].tsx.
The solution structure will be this:
- src
- pages
- …path.tsx
- products
- path.tsx
- pages
Now, in the new [path].tsx file we need to change the getStaticPaths function in order to block the pre-rendering of the pages in that path.
export const getStaticPaths: GetStaticPaths = async () => { let paths: StaticPath[] = []; let fallback: boolean | "blocking" = "blocking"; paths = []; fallback = "blocking"; return { paths, fallback, };};Also, we need to change the getStaticProps function in order to add to the context the request path and the path itself.
export const getStaticProps: GetStaticProps = async (context) => { if (context.params) { context.params.requestPath = context.params.path; context.params.path = [`products/,-w-,`]; } const props = await sitecorePagePropsFactory.create(context); return { props, // Next.js will attempt to re-generate the page: // - When a request comes in // - At most once every 5 seconds revalidate: 5, // In seconds notFound: props.notFound, // Returns custom 404 page with a status code of 404 when true };};Finally, in order to make Next recognize your new path file, you need to add the name of your folder to the matcher in the middleware config.
export const config = { /* * Match all paths except for: * 1. /api routes * 2. /_next (Next.js internals) * 3. /sitecore/api (Sitecore API routes) * 4. /- (Sitecore media) * 5. all root files inside /public (e.g. /favicon.ico) */ matcher: [ "/", "/((?!api/|_next/|products/|sitecore/api/|-/|[\\w-]+\\.\\w+).*)", ],};Now all the requests that start with /products/ are going to be handled by the new path file, and that means that you can access the context and get the requested path.
Create Component
After this, you can create the component that is going to be connected to the WildCard in Sitecore. This component is where you are going to have all the logic in order to get the data you need to render the requested page. In our case, we have the product id in the URL, so we can easily get the data of that product from OrderCloud in order to return all the needed data to the product detail page.
As in all components, you need to declare the types needed for it, the getStaticProps function, and the FEE component.
Types
For this page, we have defined a lot of types, but the important one is the ProductDetailPageProps which is going to be passed to the FEE component.
export type ProductDetailPageProps = { product: ProductProps; ... // More properties ...};There we have the product which is going to have all the data coming from OrderCloud.
export type ProductProps = { Gallery: ProductImage[] | undefined; ShortName: string; Part: string; //product id - sku BrandName: string; Description: string; Price: string; ... // All the properties ...};Get Static Props
Here is where the logic comes into play. We need to get the product id from the URL, and we can do this by getting the context and the request path from it.
export const getStaticProps: GetStaticComponentProps = async (_, __, context) => { let productSku = ''; const path = context?.params?.requestPath; if (path !== undefined) { if (typeof path !== 'string') { productSku = path.pop() ?? ''; } else { productSku = path; } } ... /// More Logic ...}Then you can add the logic to get the product from OrderCloud and map all the data to your type.
//instantiate OrderCloudClientconst api = new OrderCloudClient();const ordercloudProduct = await api.queryProduct(productSku);const product: ProductProps = { ... // Map all properties ...}return { product };As mentioned before, you could get the data from the corresponding item using GraphQL and return the data you need the same way.
let productSku = "";if (layoutData.sitecore.context.pageEditing) { productSku = "d1f61b3d";} else { const path = context?.params?.requestPath; if (path !== undefined) { if (typeof path !== "string") { productSku = path.pop() ?? ""; } else { productSku = path; } }}FEE Component
You will need to return your component but with 2 important things: A validation for a real product to return to a 404 page, and the Title in the head tags in order to change the title of the page. If this is not done you will get (*) as the title.
export const ProductDetailPage = ( props: ProductDetailPageProps): JSX.Element => { const router = useRouter(); useEffect(() => { if (!props.product) { router.push("/404"); } }, [props, router]); return ( <> <Head> <title>{props?.product?.ShortName}</title> </Head> ... // The rest of the VIEW ... </> );};CMS Configuration
First, create a rendering for that component. Then, create a partial design for that product detail page and add the rendering.
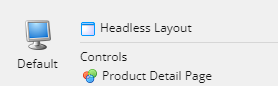
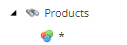
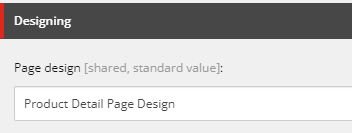
After that, create a page design and add your designs (Header, Footer, ...). And finally, create the Products item and then the WildCard and select the page design for it.
| WildCard | Design |
|---|---|
 |  |
Now you can visit a URL with a real product id and you will see the result!